After Purchase the script and download the zip package, unzip it. you will get three folders
- docs
- script
- sql
- updates
Upload script folder contents to your site (folders & files)
Sometimes, Operation systems hide .htaccess file.
Make sure this file is uploaded to your host.
or create a new file with the name .htaccess and add the content below to it and upload it to your main folder.
RewriteEngine on
RewriteRule ^change-password$ user-setting.php?case=change_password
RewriteRule ^signup$ signup.php
RewriteRule ^login$ login.php
RewriteRule ^contact$ contact.php
RewriteRule ^services$ services.php
RewriteRule ^dashboard/messages$ messages.php
RewriteRule ^dashboard/orders$ orders.php
RewriteRule ^dashboard/account$ account.php
RewriteRule ^service/(.*)$ service.php?slug=$1
RewriteRule ^pay/(.*)$ pay.php?slug=$1
RewriteRule ^free/(.*)$ free.php?slug=$1
RewriteRule ^page/(.*)$ page.php?slug=$1
RewriteRule ^dashboard/orders/order/(.*)$ order.php?id=$1
RewriteRule ^download-attachment/(.*)$ download.php?id=$1
RewriteRule ^download-file/(.*)$ download_file.php?id=$1
RewriteRule ^process-order$ process_order.php
RewriteRule ^user-activation/(.*)/(.*)$ user-tools.php?case=confirm_user_email&email=$1&activation_code=$2
RewriteRule ^reset-password/(.*)/(.*)$ user-tools.php?case=reset_password&email=$1&activation_code=$2
RewriteRule ^forget-password$ user-tools.php?case=forget_password
RewriteRule ^not-found$ 404.php
RewriteRule ^category/(.*)$ category.php?id=$1
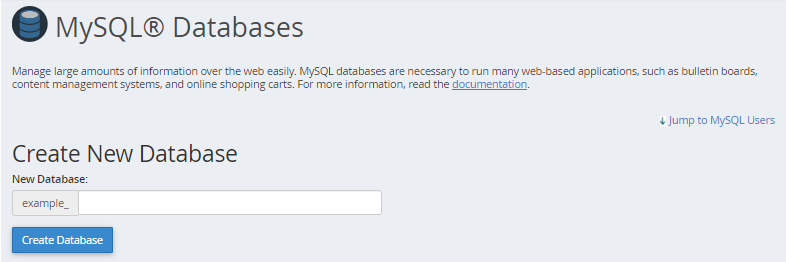
To Create Database login to your cpanel.
Search for Mysql Database.

By clicking on Mysql Database Link you will go to the Database Managment.
First : Create a New Database
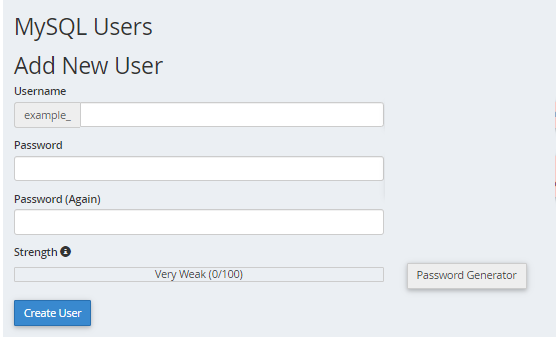
Second : Add a New User
Third : Add a User to Database
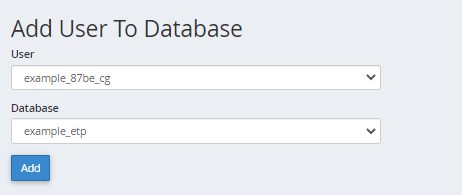
Finally, assign privileges to a database user

Open the file config.php located at include folder and change values to yours.
$db_config = array(
   'host' => 'localhost',
   'user' => 'your_database_username',
   'pass' => 'your_database_password',
   'name' => 'your_database_name'
);
After uploading files, creating database and editing config.php file, now it’s time to start the installation:
Go to https://yoursite.com/install/install.php
If this installation failed, you can install the database manually.
the SQL file is attached with the script and located at sql folder.
the default admin details are :
Username : admin
Password : demo
After Version 2.2, the script comes with update section where you only need to upload the update zipped file from admin panel (No FTP no CPanel) .. just upload the update folder and everything will be Ok.
To update manually, unzip the update folder and move its content to your server, replace the existed files with new ones.
If there is Database Changes you will find db.sql file, copy its content, paste and execute it in your PHPMyAdmin SQL.
API information includes two important values: Client ID and Client Secret. Follow these steps to generate them:
Step 1: Go to https://build.envato.com/ and Sign In
Step 2: Click on button ‘Register a new app’
Step 3: Fill all required forms:
- App Name (like Support Portal)
- Required Permissions, choose the following :
- View and search Envato sites
- View the user’s Envato Account username
- View the user’s email address
- View the user’s account profile details
- Confirmation URL : is the link to your website or the folder that you installed the script in :
https://yoursite.ltd
or
https://yoursite.ltd/microncer/ - Check I have read, understood and agree to the Terms and Conditions
Press ‘Register App’
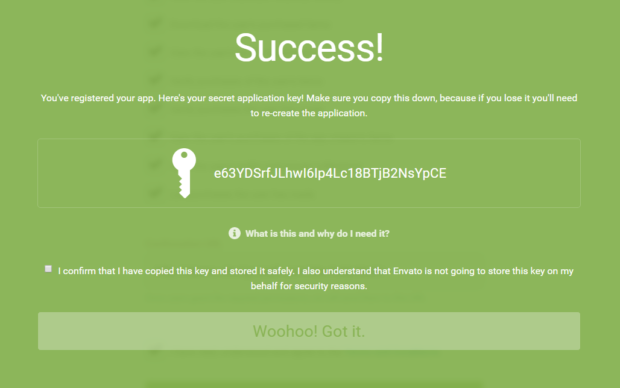
Step 4: Then you will see a popup which shown:
You’ve registered your app. Here’s your secret application key! Make sure you copy this down, because if you lose it you’ll need to re-create the application.
You should copy a long string and keep it safe, because it is origin and can not see it again.
Step 5: Navigate back to ‘My apps’, now you can see registered app at “Apps you’ve registered”. Under ‘App name’, you can find ‘Client ID’ value.
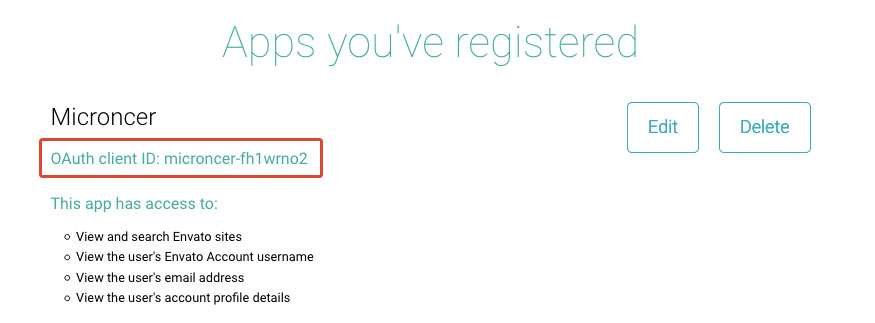
When you go back to My Apps & Credentials Page you will find the App that created.
Click on App name and go to app details where you can find the PayPal Client ID and PayPal Client Secret depending on which mode you want (SandBox or Live Mode).
-
Site Url
where the script is installed.
note : if you install the script in sub-folder add slash at the end of the link : https://your-domain.ltd/script/
while if it is in root just use it without slash at the end : https://your-domain.ltd -
Site Name
the name of your website, your brand name or any chosen name.
-
SEO Keywords
for search engines optimization purpose.
-
SEO Description
for search engines optimization purpose.
-
Site Language
you can choose the main language for your site
-
Site Theme
you can choose your website theme/skin.
the script comes with default theme.
more themes will be added in next updates.